

6 Best Drying Nets For Flat Knit Items For Your Studio
Keep your knitwear in shape with our top 6 drying nets. Discover the best tools to prevent stretching and ensure perfect air circulation for flat-knit items.
After spending two decades behind the needles, I have learned that the finish of a project is just as critical as the cast-on. A garment’s final shape, drape, and professional appearance rely entirely on how it is handled once it leaves the needles. Investing in a quality drying net is the difference between a sweater that looks store-bought and one that looks homemade in the wrong way. Here are the tools I trust to keep your hard work looking its absolute best.
OXO Good Grips Folding Sweater Drying Rack

This rack is a perennial favorite for a reason: it is remarkably sturdy. When you are blocking a heavy, wool-blend cabled sweater, you need a frame that won’t buckle under the weight of saturated fibers.
The folding mechanism is intuitive, and it collapses into a slim profile that tucks easily between your laundry machines. I appreciate the non-slip edges, which prevent the rack from sliding off a table or countertop during the setup process.
However, keep in mind that the footprint is fixed. If your studio space is cramped, ensure you have a flat surface large enough to accommodate its full dimensions before committing.
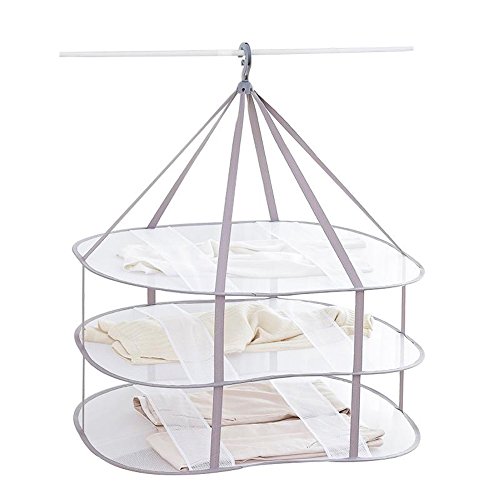
Household Essentials Stackable Mesh Dryer

Vertical space is often the most precious commodity in a knitter’s studio. This stackable system allows you to dry multiple items—like a full sweater set or a collection of lace shawls—without monopolizing your entire floor.
The mesh is tight enough to prevent snagging on delicate mohair or fine silk blends. Because the air circulates freely through all sides, you don’t have to worry about the dreaded "musty" smell that can occur when a garment sits too long in a damp state.
My only caveat is the assembly; the connectors can be a bit finicky if you are stacking more than three tiers. Be sure to place your heaviest items on the bottom to maintain a low center of gravity.
Eon Concepts Hanging Sweater Drying Rack
If you have absolutely zero horizontal surface area, a hanging rack is your best friend. This design utilizes a hook-and-loop system to attach to a shower rod or a sturdy garment rack, effectively turning your vertical space into a drying station.
It is particularly excellent for blocking lace shawls that require a specific, gravity-assisted stretch. Because the rack hangs, you can easily rotate it to ensure even airflow throughout the day.
Be careful not to overload it, though. If you are blocking a dense, worsted-weight wool, the weight distribution might cause it to tilt, which can distort your blocking wires or pins.
Whitmor Clip-On Mesh Sweater Drying Rack

This is a clever, no-nonsense solution for those who already have a standard laundry drying rack. It clips directly onto existing bars, providing a flat, mesh surface for your knits.
It is an incredibly cost-effective way to convert your existing equipment into a dedicated blocking station. I find this perfect for small items like socks, hats, or mittens that don’t require a massive footprint.
Just ensure your existing rack is stable enough to handle the concentrated weight. If your metal rack is flimsy, adding a heavy, wet sweater to one side might cause the whole thing to tip over.
Smart Design Stackable Mesh Drying Rack

These racks are known for their reinforced frames, which provide a bit more structural integrity than your average mesh net. The mesh is durable and resists the sagging that often plagues cheaper alternatives after a few dozen uses.
I recommend these for knitters who work primarily with heavy, natural fibers like Corriedale or Highland wool. These fibers hold a significant amount of water, and a weak frame will eventually bow, pulling your carefully pinned stitches out of alignment.
They are also very easy to clean. If you accidentally get a bit of dye transfer or dust on the mesh, a quick wipe-down keeps your surface pristine for the next project.
Honey-Can-Do Folding Sweater Drying Rack

This rack offers a large surface area that is perfect for wider garments like cardigans or oversized pullovers. The folding design is straightforward, making it one of the most user-friendly options for beginners.
It’s a reliable workhorse that doesn’t try to reinvent the wheel. It simply provides a flat, breathable surface that gets the job done without any complex assembly or fragile parts.
If you are a knitter who values simplicity and reliability, this is a solid investment. Just make sure you measure your drying space first, as the width can be surprisingly generous.
Why Flat Drying Is Vital for Hand-Knit Wool
Hand-knit wool is a living, breathing material. When it’s wet, the fibers are at their most vulnerable; hanging a wet wool sweater on a hanger will almost always result in shoulder bumps and distorted necklines.
Gravity is the enemy of a perfectly blocked garment. By drying flat, you allow the fibers to settle into their intended shape rather than stretching under the weight of the water.
This is especially true for superwash wools, which can be prone to "growing" significantly when wet. Flat drying ensures that the garment stays true to the measurements you achieved during your swatch stage.
Essential Tips for Blocking Delicate Fibers
Always remember that blocking is about setting the stitch, not stretching the fabric into submission. For lace, use rust-proof T-pins to gently guide the points into shape, but don’t pull so hard that you break the yarn.
If you are working with protein fibers like silk or alpaca, be extra cautious. These fibers have less "memory" than wool and can easily lose their shape if over-stretched while drying.
- Always use cool water to avoid felting.
- Roll, don’t wring: Use a towel to remove excess moisture before moving the item to the rack.
- Check your pins: Ensure they are stainless steel to avoid rust marks on light-colored yarn.
How to Maximize Airflow for Faster Drying
Airflow is the secret to preventing mildew and ensuring your knits dry evenly. If your studio is humid, consider placing a small fan nearby, but never point it directly at the garment.
A gentle breeze is better than a direct blast. You want to mimic the effect of a light wind, which will speed up the process without drying out the surface of the fiber too quickly while the core remains damp.
Also, try to flip your garment halfway through the drying process. This ensures that the side against the mesh doesn’t stay damp longer than the top side.
Common Mistakes When Drying Hand-Knits
The most common mistake is impatience. Taking a garment off the rack while it is still "damp-dry" is a recipe for disaster, as the fibers will shift the moment you put it on.
Another frequent error is failing to shape the garment properly before it dries. If you lay it down in a heap, it will dry in a heap; take the extra five minutes to smooth out the seams and square up the hem.
Lastly, don’t block in direct sunlight. UV rays can fade natural dyes and make some fibers, particularly silk and linen, brittle over time. Keep your drying station in a well-ventilated, shaded area.
Mastering the final stages of your knitting project is just as rewarding as finishing the final bind-off. By choosing the right drying rack and respecting the needs of your specific fibers, you ensure your garments remain heirloom-quality for years to come. Take your time, trust your tools, and enjoy the process of seeing your stitches bloom into their final form. Happy knitting, and may your blocking always be successful.
